I got a Maglite Solitaire LED flashlight this summer, but I already had two regular incandescent ones. Â Once you get used to the LED one, the incandescent one is so… dim… and yellow. Â It’s really really convenient, though, and I’d hate to just drawer it, or worse yet, junk it.
I got a cool little module from eBay that just plugs right in and you’re done. Â About $7. Â Is that as good as it gets?
I found a pretty good tutorial on YouTube about how to mod an existing one to LED, so I thought I’d try it, and what is explained below is that exact project, with some slight changes. Â The main thing is that a 1.5v cell isn’t enough to drive a decent LED light, so I’d either need to build a teeny tiny booster (probably what was done in the module above) or change the source voltage. Â Voltage it is!
The space is limited in the battery compartment. Â So what to do? Â Very small batteries with 1.5v… sounds like a watch battery. Â Also sounds expensive… but, the YouTube video explained how you can get an A23 battery and peel it open to gain 8 LR932 cells!
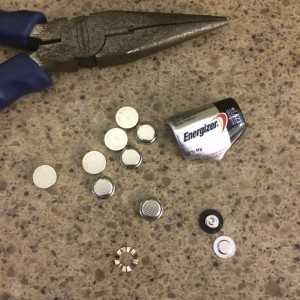
I found a double-pack of these batteries for just over $5. Â Shop around, the prices can vary considerably. Â Make sure it’s an alkaline battery, apparently there are some carbon batteries this size but they aren’t going to have anything near as tidy inside (i.e. “gunk”).
Note, If you do this, keep the positive and negative terminal bits.
You will only need 3 cells for one light, so put aside 5 of them.  Now we need to make a spacer so that the battery reaches both terminals inside the flashlight.  Get a pen tube and cut it to approximately 30mm.  You don’t need to be laser-precise, but get as close as you can.
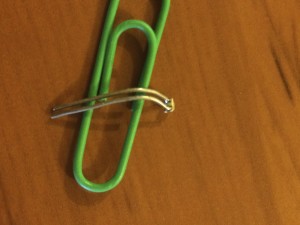
Next, LEDs really should have a current-limiting resistor to prevent them blowing up. Â Technically these cells probably have enough internal resistance to it’s not a problem, but I wanted to add a tiny amount of extra just in case. Â The video suggested a 68 ohm resistor, but I didn’t have that, so I used a 51 ohm one. Â I did say a tiny amount, didn’t I? Â With a hammer and nail (or screw), poke holes in the top and bottom of the disassembled terminals you saved from before. Â Solder one through the hole and then fish it through the pen tube and solder on the other end, again through the hole.
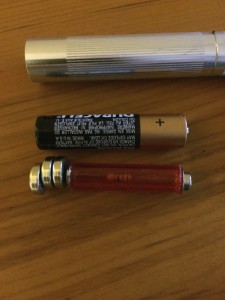
Note that the plastic may melt as you solder this, another reason to leave a mm or two to spare on the length of the tube. Â With the cells and the spacer you now have a 4.5v “battery” the same length as a AAA cell.
Pop them into the battery compartment – pay attention to the orientation of the little cells, it almost seemed backwards to me at the time. Â The flat side is positive and should be facing the bulb socket.
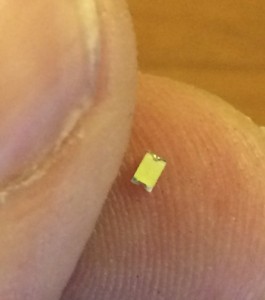
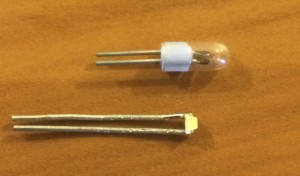
Now to get the LED bulb in there. Â I assumed that I needed a really tiny LED, so I went and ordered some SMT ultra-bright LEDs from Amazon. Â I just got them and yup they are really tiny. Â These are designed for automated pick & place production but it’s not impossible to solder them manually! Â I got two small cutoff leads from a capacitor and tried to figure out how to place them on this thing… first step was to get a ball of solder on each of the LED’s solder pads. Â That’s fairly simple, just blob some melted solder on the bottom, and it will congeal on each pad as it should.
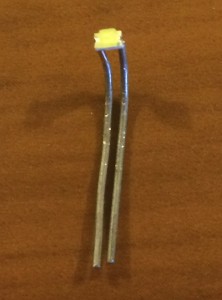
Lining up the leads, though, was another thing. Â I decided to poke them into a cork, bend them over so they were going straight into the back of the LED and then just heat the blobs just enough to melt the leads into it. Â Not too hard!
Next, test it in the flashlight.  Remember that these are diodes, so if you plug it in one direction it may not work, even though the connection is perfect!  Try flipping the leads around and plugging it in the other way.  You too may be pleasantly blinded by the light.  (Curiously, that song was playing on Spotify just as I was doing this, and I only realized it now). If you are using needle nose pliers as I was to push in the diodes, grasping both of the leads, remember you are shorting the connection as you push it in.  It will not light up as you are doing this… so make a connection and then let it go for a second to make sure it’s working.
 Now to trim down the leads. Â I decided that the base of the LED should be at the same spot as the base of the regular bulb. Using that comparison, I snipped off the leads and then tried to carefully push the leads again into the light… and ripped the trace right off the SMT LED. Â 🙁
Oh well, I had ordered 50 of the little thingies (that’s the technical term), so I did it all again. Â This time I was more careful, and taped off the jaws of my needle nose pliers so I could see if it was working as I was inserting it. Â It worked, and blinded me again!
With my good eye, I could see that the tiny little LED fits through the bulb hole in the reflector with room to spare. Â I actually realized as these were on order that I could have ordered actual 3mm ultra-bright LEDs and just cut and plugged it in. Â Hm. Â Well, let’s just say they’re on order now. Â I will at least have a point for comparison (and 48 more SMT LEDs). Â The connection point from the lead to the LED (say that out loud) is probably fragile, but it may have enough shock absorption in from the case and being suspended 1/4″ away from the body of the light. Â In any case, I will use the spare bulb location in the base of the battery compartment for one of the other LEDs, so I will always have one even if it does break.
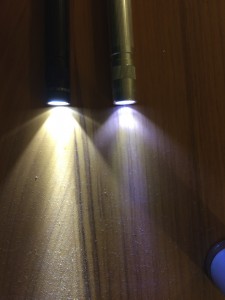
The result is pretty decent. Â It looks like the first-party Maglite installed version is a fair bit brighter – and has the advantage of using standard AAA cells. Â However, IÂ am curious how the battery drain compares on these two, and how much different the 3mm LED is once I get it.
All in all, not too hard of a project. Â The price was reasonable and the result is definitely superior to the original incandescent light. Â If you had the LED and the battery on hand, you could probably do this in about 20 minutes to half an hour.
Leave a Reply
You must be logged in to post a comment.